Message Tracking In Exchange Server 2016
In this article, you will find how to configure message tracking in Exchange Server 2016. I will discuss it using Exchange Management Shell Commands and Exchange Admin Center (EAC).
Table of Contents
As you might know, Message tracking is a very crucial administrative activity, with Message tracking admin can get the record for message forensics, reporting, mail flow analysis, and troubleshooting.
Moreover, understanding mail flow and client access configurations is crucial for effective message tracking in Exchange Server 2016.
This all can be done with the help of the Message Tracking Log, which captures the detailed record of all activities such as the flow of mail passing through the transport pipeline on the mail server and Edge Transport server.
In order to manage the hard disk space, Exchange uses circular logging. Circular logging, will limit the message tracking by removing the older entries.
How to Configure Message Tracking In Exchange Server 2016
The configuration of message tacking can be performed with PowerShell cmdlet and EAC. Additionally, to ensure seamless mail flow, you must know how to Configure Relay Connector Exchange 2016. This will allow you to optimize your message tracking setup. Microsoft itself gives detailed accounts on how to setup and use this method. However, the lack of visual information can make it thought for novice admins to figure out what exactly the steps indicate. So, below we have reduced the complexity of the steps and also included digital imagery of the corresponding steps.
Using Exchange Management Shell
Admin can use Exchange Management Shell cmdlet on Edge Transport server and Mail server for message tracking. With the help of the Set-TransportService cmdlet, the admin can configure message tracking in the Exchange Server.
For Instance,
For configuring message tracking with definite parameters:
- Server name ExMailbox
- The location of the message tracking log files to E:\Message Tracking Log.
- Size of a message tracking log file to 15 MB.
- Size of the message tracking log directory to 2.0 GB.
- Age of a message tracking log file to 30 days.

How To Verify Successful Configuration Message Tracking Using PowerShell
To verify that message tracking has successfully configured, the admin can run the following command
Get-TransportService CU13 | Select-Object MessageTrackingLogPath, MessageTrackingLogMaxFileSize, MessageTrackingLogMaxDirectorySize, MessageTrackingLogMaxAge
Using EAC To Configure Message Tracking In Exchange Server 2016
- Open the EAC

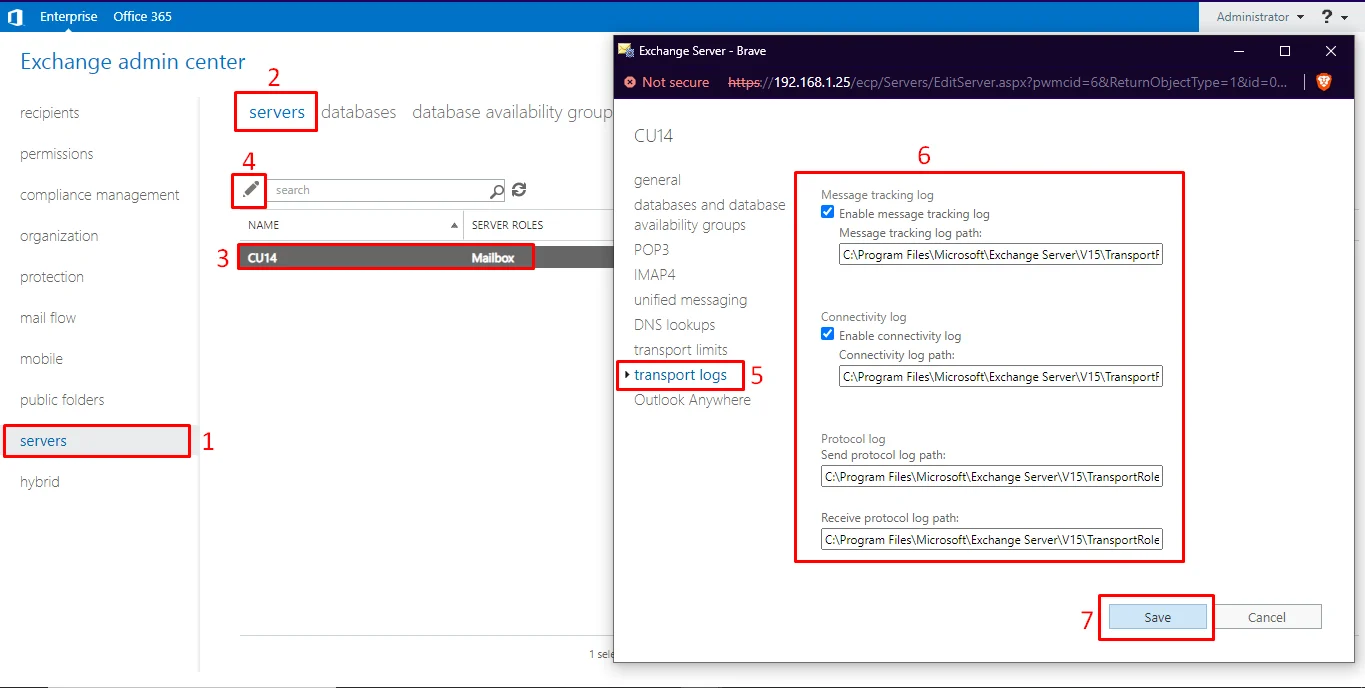
- Go to Server >Servers and select the Mailbox server that the admin wants to configure
- Click Edit
- It will display the server properties page, click Transport Logs. In the Message tracking log section, the admin can change any of the following settings:
Enable message tracking log For tracking the messages on the server, select the check box.
Message tracking log path The value admin will specify must be on the local Exchange server. A new folder is made once the admin clicks on the Save button. - Click Save.

Perform Message Tracking In Exchange Server 2016
Admin can get the delivery report with EAC. Delivery report is a message tracking tool that will search the status of the messages that were sent from or to the organization Exchange. Admin can get track of delivery information of the sent or received message.
How To Get Message Tracking Log in EMS
Admin can get the message activity using GetMessageTrackingLog cmdlet in Exchange Management Shell that will result message tracking log consist message entries. It will give information regarding the messages that include:
- What happened to a message that was sent by a user to a specific recipient?
- To find out the transport rule applied to a message.
- Information about the message received from an Internet sender to an Exchange organization.
- To get information about the messages sent by a specific user during a specified time period.

For Controlled OutputAdmin can use the following syntax for controlled output 
How To Track The Message With EAC
- In the EAC, go to Mail Flow and click Delivery Reports.
- Mailbox to search Click on Browse to select the mailbox
- then click OK
Select one of the following:
For sent messages This option will search messages sent to specific users from the selected mailbox.
For received messages This option will search the messages that are received by the selected mailbox.
- When finished, click Search. If you want to start it again, click Clear.
What to Do After Finishing Message Tracking in Exchange 2016
Once admins are satisfied with what they find on the GUI console, the next step is usually exporting the message contents for outside review. Exchange 2016 message tracking done with PowerShell or GUI module cannot show admins the actual contents of the message.
Moreover, instead of using the default download mechanism on the EAC, which is limited to PST, what they can do is rely on a professional Exchange Export Tool from SysTools.
Download Now Free Purchase Now 100% Secure
This tool holds significant advantages over the traditional method, the best one being multi-format output. So admins can get the data not just in PST, but also in MBOX, EML, PDF, etc.
Download the tool on your workstation and follow these steps:
- Open and choose endpoints: Exchange as the source and any of the available output formats.
- Then go down to the workload section, select the email option, and press Next.
- On the source screen, select the Exchange version, add the IP address, admin credentials, and validate.
- Likewise, on the destination page, validate the location where you will keep the files.
- Then perform user mapping with any one of the options, i.e., Fetch, Import, or Download.
- The Preview Screen allows you to select exactly those users whose messages you want. You can also apply priority to them with the star icon. Validate the selection and begin export by pressing Start.
Apart from emails, you may also get information on other workloads, such as calendars and contacts, in the same export run.
If, by any chance, items are missing, there is an option to retry failed items post-export.
Conclusion
This article write-up is completely about how to configure message tracking in Exchange Server 2016. We gave you not only the Exchange Admin Center (EAC) but PowerShell commands as well. In the last of this article, I have also described how to get a message-tracking log. In addition to message tracking, implement Mailbox Audit Logging in Exchange Server 2013 this provides valuable insights into other mailbox activities.
I hope that the above-mentioned methods can help an exchange admin to configure message tracking in exchange server 2016.
Frequently Asked Questions
Does the Exchange Server encrypt the message tracking logs post-generation?
No, Exchange Server has no provision to encrypt the said data; you must deploy security on your end, or better yet delete the logs after their use.
Can I lengthen or shorten the message tracking log duration, if so by how much?
Yes, Exchange Server lets you do that; all you need to do is change the MessageTrackingLogMaxAge parameter in the Exchange Management Shell. The default 30-day retention period can but you can adjust it (min. 1 day) or extend it according to your organization’s storage and logging needs.
Is it possible to change the default location of Exchange Server message logs on my workstation?
Yes, admins can type in a new path that is different from the preset one %ExchangeInstallPath%TransportRoles\Logs\MessageTracking; simply select and delete the existing path, then type in a new path in its place. Make sure you save the changes and restart your machine to see its effects.