Export Exchange 2016 Mailbox to PST with PowerShell – Stepwise Guide
MS Exchange Server uses an active directory for the storage of user accounts and its mailbox Database. A single mailbox database is used to store the mail data of each user account. However, the contents of the mailbox cannot be accessed in Exchange applications when there is a network issue, unavailability of Server, server downtime, etc. In such situations, a user may need to export the Exchange mailbox to a PST file, which can then be accessed in MS Outlook in the absence of Exchange Environment. The blog will discuss how a user can export Exchange 2016 Mailbox to PST with PowerShell commands.
Table of Contents
Instant Solution: You can use the SysTools Exchange Export tool to export Exchange mailbox to PST from Live Exchange Server 2016 / 2013 / 2010 / 2007 / 2003 in a simplified manner without any trouble. This utility is capable of exporting the enabled, disabled, disconnected, disabled, corrupt, hosted, and journal mailboxes to the Outlook PST file. For example: if you want to convert the Exchange 2010 mailbox to a PST file then users can easily export it with the help of this software in a hassle freeway.
Download Now Free Purchase Now 100% Secure
Pre-Requisites Before Export Exchange Mailbox Process
Before starting the export process, an admin needs to make sure of two things,
First on the Exchange Server, the account that will be used to conduct Export has adequate permissions. If not add all the necessary ones. Second, on the Local destination is there a new Network Shared folder or not? Without the role, export can’t start, and the absence of Read/Write permissions of the group Exchange Trusted Subsystem means Export can fail at any point. Don’t worry We will help you complete the prerequisites in an effortless manner. Let us Start with permissions first.
How to Add Mailbox Import Export Role to Get Exchange 2016 Mailbox Data in PST Format
- Log in to EAC (<yourExchangeServerIP>/ecp) with the admin credentials.
- Go to the Permissions tab.
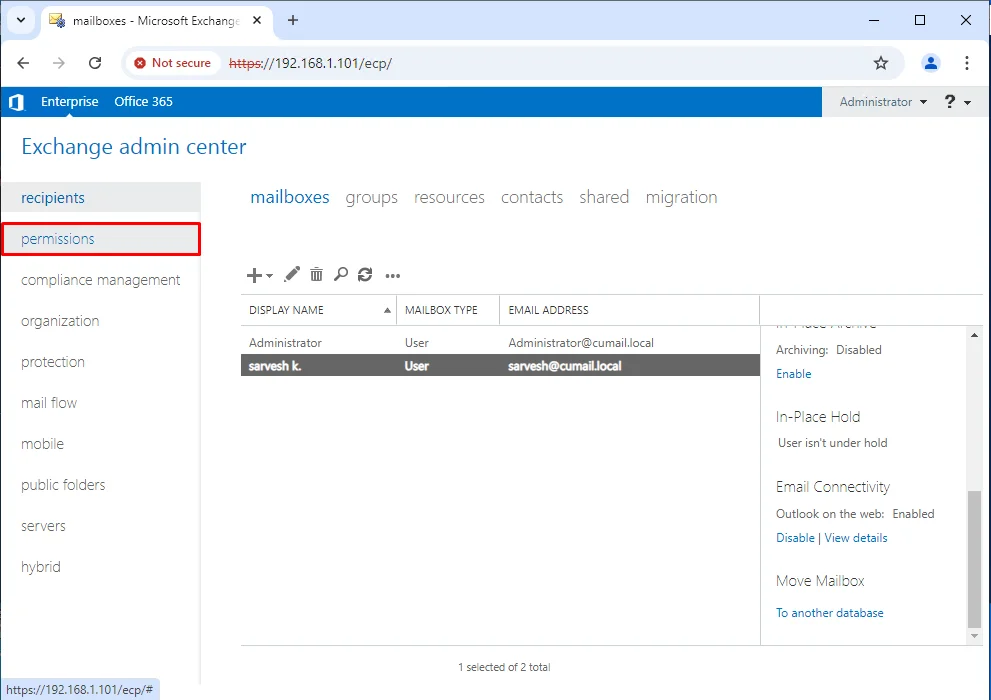
- There, you have two options: either add the Mailbox Export feature to an existing role or build a new role only for the Mailbox Export task. We recommend the latter, as it helps maintain Role-Based Access best practices.
- Hit the + icon.
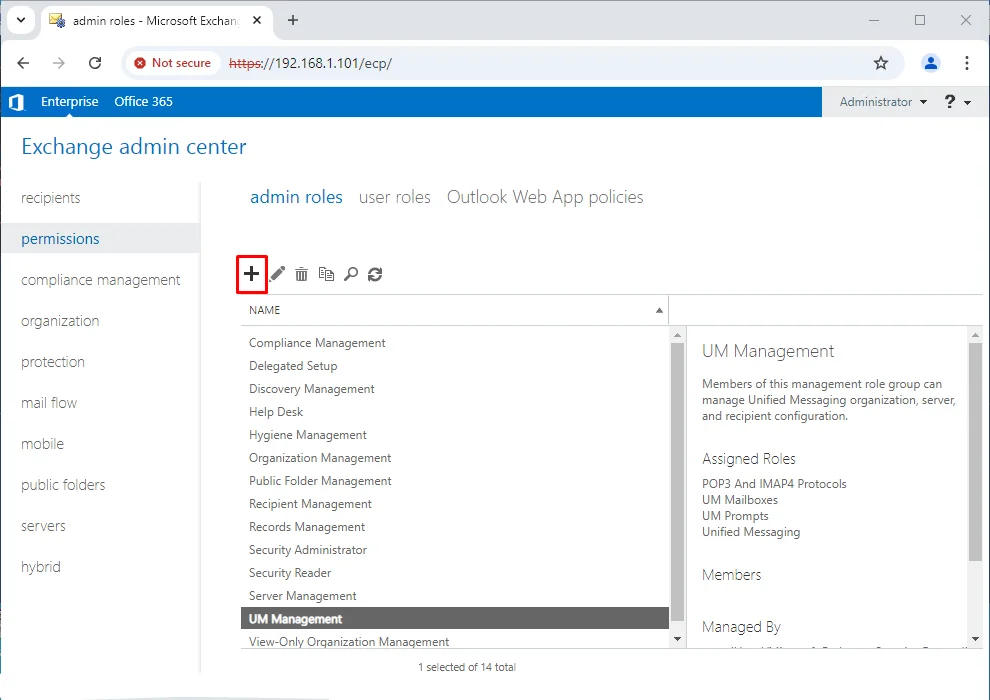
- A new window opens; add an appropriate name for the role (mandatory), type out a short description explaining what the role is for (optional), and click on the + icon under the Roles section.
- This will open yet another window where you need to scroll and find the Mailbox Import Export role; select it, press the Add button, and hit OK.
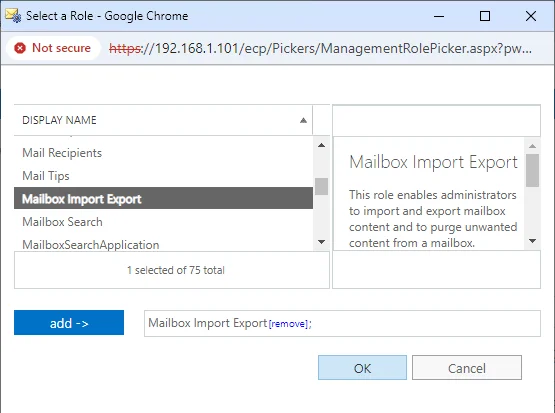
- You will see that Mailbox Import Export is now part of the Roles tab.
- Scroll to the Members tab of the Role group window and hit the + icon.
- In the Select Members window, pick the members to whom you want to assign this role. Hold the Shift key to perform continuous multi-selection, or press the Ctrl key and select a distributed list of members for this role.
- Now that both the role and members are finalized, hit the Save button.
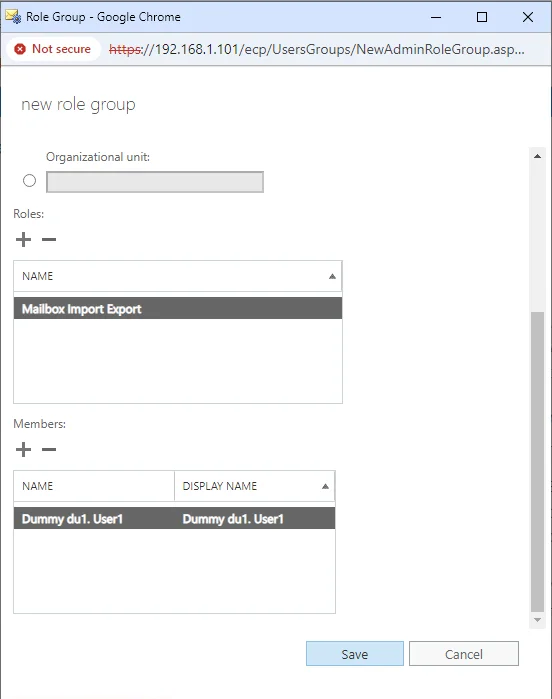
- The EAC takes you back to the main Recipients page, so go to the Permissions tab and see if the new role is there or not; select it to verify the assigned role and member list.
- If you have added the main admin account to the role, you must log out and log in again for the role effect to materialize.
For PowerShell purists, we have the script-based alternative for all of the EAC Steps.
Use PowerShell to Add Mailbox Import Export Role and Extract Exchange Server Data
Tap the Windows Key
In the Search Bar Type “Exchange Management Shell”.
Note you won’t even need to type the full name your windows machine would recommend it on its own use the arrow keys to get there and Press Enter.
As we are already using the Exchnage Management Shell there is no need to explicitly connect to the Exchnage Server. However, in case you only have access to the default Windows PowerShell Version then also there is no need to worry Simply do this and continue with the rest of the steps as it is.
1. Open Windows PowerShell.
Run:
$UserCredential = Get-Credential
(Enter UPN & password in the dialog box)
Replace <ServerFQDN> with your Exchange server’s FQDN:
$Session = New-PSSession -ConfigurationName Microsoft.Exchange

-ConnectionUri http://<ServerFQDN>/PowerShell/

-Authentication Kerberos -Credential $UserCredential
Run:
Import-PSSession $Session -DisableNameChecking
Type the following one after the other.
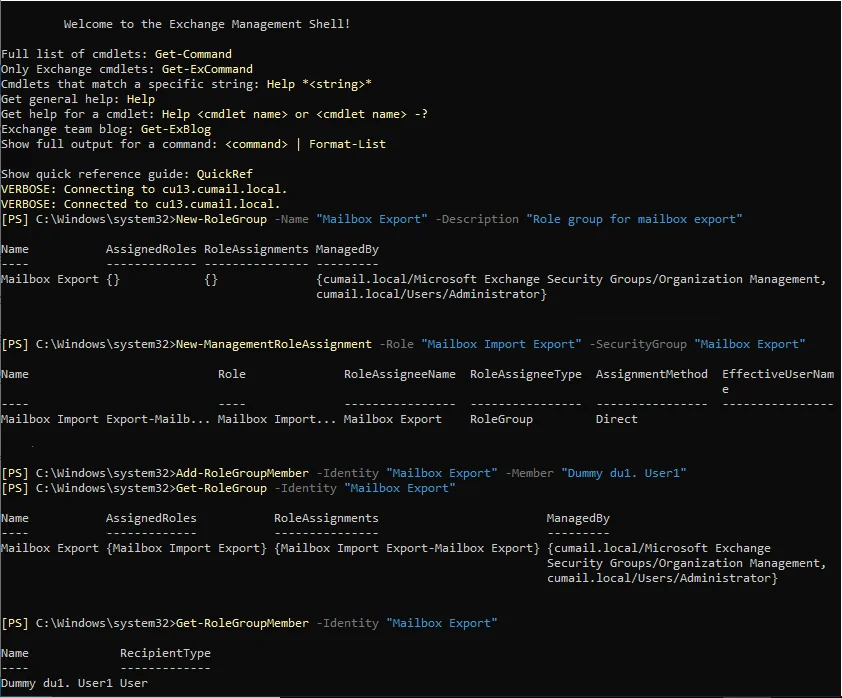
New-RoleGroup -Name "Mailbox Export" -Description "Role group for mailbox export"

New-ManagementRoleAssignment -Role "Mailbox Import Export" -SecurityGroup "Mailbox Export"

Add-RoleGroupMember -Identity "Mailbox Export" -Member "Dummy du1. User1"

Get-RoleGroup -Identity "Mailbox Export"

Get-RoleGroupMember -Identity "Mailbox Export"
PowerShell enthusiast note: Microsoft explicitly states that if you have assigned more than one role permission via PowerShell/ Exchange Management Shell then you can’t revoke it through the GUI based EAC.
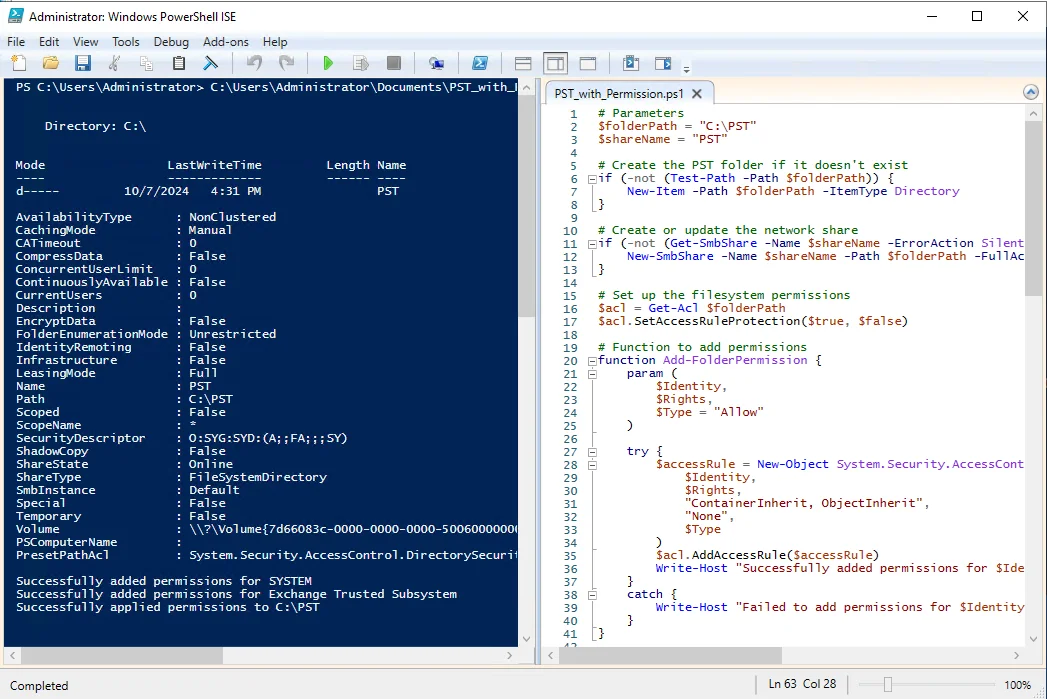
PowerShell Script to Setup a Network Shared Folder to House Extracted Exchange Data
# Parameters
$folderPath = "C:\PST"
$shareName = "PST"

# Create the PST folder if it doesn't exist
if (-not (Test-Path -Path $folderPath)) {
New-Item -Path $folderPath -ItemType Directory
}

# Create or update the network share
if (-not (Get-SmbShare -Name $shareName -ErrorAction SilentlyContinue)) {
New-SmbShare -Name $shareName -Path $folderPath -FullAccess "SYSTEM" -ErrorAction Stop
}

# Set up the filesystem permissions
$acl = Get-Acl $folderPath
$acl.SetAccessRuleProtection($true, $false)

# Function to add permissions
function Add-FolderPermission {
param (
$Identity,
$Rights,
$Type = "Allow"
)

try {
$accessRule = New-Object System.Security.AccessControl.FileSystemAccessRule(
$Identity,
$Rights,
"ContainerInherit, ObjectInherit",
"None",
$Type
)
$acl.AddAccessRule($accessRule)
Write-Host "Successfully added permissions for $Identity"
}
catch {
Write-Host "Failed to add permissions for $Identity. Error: $_"
}
}

# Add permissions
Add-FolderPermission -Identity "SYSTEM" -Rights "FullControl"

# Try different ways to identify Exchange Trusted Subsystem
$exchangeIdentities = @(
"Exchange Trusted Subsystem",
"$env:COMPUTERNAME\Exchange Trusted Subsystem",
"NT AUTHORITY\EXCHANGE TRUSTED SUBSYSTEM"
)

$exchangePermissionAdded = $false
foreach ($identity in $exchangeIdentities) {
try {
Add-FolderPermission -Identity $identity -Rights "Modify, Read"
$exchangePermissionAdded = $true
break
}
catch {
Write-Host "Couldn't add permissions using $identity"
}
}

if (-not $exchangePermissionAdded) {
Write-Host "WARNING: Could not add Exchange Trusted Subsystem permissions. Please verify that Exchange is installed on this server."
}

# Apply the new ACL to the folder
try {
Set-Acl -Path $folderPath -AclObject $acl
Write-Host "Successfully applied permissions to $folderPath"
}
catch {
Write-Host "Failed to apply permissions. Error: $_"
}

# Display current share permissions
Get-SmbShare -Name $shareName | Format-List
Write-Host "`nCurrent NTFS Permissions:"
(Get-Acl $folderPath).Access | Format-Table IdentityReference, FileSystemRights
To prove that the script works as intended we have attached a PowerShell screenshot.
Export Exchange Mailbox to PST with PowerShell
A user needs to use Exchange Management Console on the system to use the PowerShell commands. We will learn how to export Exchange 2016 Mailbox to PST Outlook in two ways:
-
For Export of Single Exchange Mailbox
We will use the following commands to export an entire mailbox to the Outlook PST file:
The Export of Exchange Mailbox to PST file will require the usage of the MailboxExportRequest cmdlet. It has two main parameters:

FilePath-It will define the Network share path of the PST file to which data needs to be exported
Mailbox– Defines the username, SMTP address or display name of the mailbox the user needs to export to PST file.
The above command is used for exporting all the data items in a mailbox to PST, however, if a user wants to export only some of the items only.- –ContentFilter
This command is used to specify the conditions that need to be met while exporting mailbox items to PST. One example is stated below:
- -ExcludeFolders and -IncludeFolders
This command allows a user to choose any desired Exchange mailbox folder. Example is:
- -IsArchive
This is a parameter to define the archive as the only source of the export. One example is:
- –Name
This parameter is used to set the name of an export request, useful for tracking and to define multiple export requests per single mailbox.
- –ContentFilter
-
For Bulk Export Exchange 2016 Mailbox to PST Powershell
In order to export multiple Exchange Mailboxes to PST file, we will save all the mailboxes to a variable using the command:
$AllMailboxes = Get-Mailbox
Now, we will export all the mailboxes to Outlook PST files using names set on mailbox aliases.
For filtering the contents, we can use the same parameters discussed above in case of single mailbox export.
Note: This procedure cannot be used for export of damaged or corrupted mailbox.
Problems While Using Powershell to Export
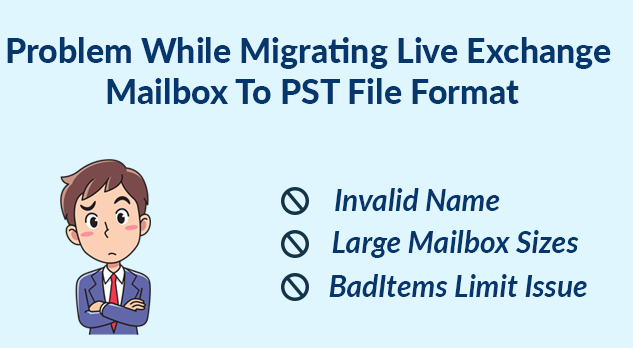
While working with ExportRequest Powershell commands, sometimes Exchange Administrator faces issues while exporting the exchange mailbox to PST formats such as:
To fix these issue, you can check out following section:
Note: The manual solution doesn’t export the offline or dismounted Exchange mailboxes to Outlook PST file. For that you can use the EDB Converter software provided by SysTools which supports the offline/dismounted EDB file and users can export multiple Exchange database mailboxes to the PST file in bulk. Also, you can easily bulk export the EDB to PST, EML, HTML, PDF, MBOX, MSG file formats in the simplest and quickest way.
Download Now Free Purchase Now 100% Secure
Best Practices
- Assign the necessary role to accounts prior to the day you want to export mailboxes from Exchange Server 2016 to PST format.
- Note you need not apply the role to the user whose mailbox is to be exported rather just assign it to the person who has to perform the Export.
- So there can be instances where a user with no Exchange mailbox of their own is able to extract PST data from the rest of the accounts.
- The Permission is not granular, meaning once assigned the role holder can export anyone’s PST any number of times. To avoid internal data breaches safeguard the permission by revoking it after the export is done.
- If you are not using the tool you should only Export the data after performing the Network Sharing. Moreover, this again is an official recommendation by Microsoft, ignoring it increases the risk of faulty transfers. We have given a stream-lined PowerShell script that can perform all the necessary steps on its own.
- So admins need not waste their time in the confusing setup and get on with the main export task. If you still think that Network Share is too problematic then you can install the tool which sips over such complex setups entirely.
- Although using PowerShell means you need not log off and relogin after permission assignment you still have to use a different Shell window. This is applicable for both regular PowerShell and Exchange Management Shell. You need not close your current window rather open a new one and continue with the export from there.
Conclusion
An Exchange Administrator can export the Exchange 2016 mailbox to PST without PowerShell commands or Commands mentioned in the above blog depth. Once the mailbox data is in a PST file users can access it in MS Outlook.
Moreover, you can copy this file to another system. It not only helps users access emails in the absence of the Exchange server but also serves users as a backup when the Exchange server is unavailable/corrupted. This procedure cannot be used for the export of damaged or corrupted mailboxes.
Frequently Asked Question
Can I export a mailbox to a local drive?
No, you cannot export directly to a local drive (e.g., C:\). The export must be saved to a UNC network path. Otherwise, your export may end abruptly or you may find some chunk of data missing from the files.
How can I split a large PST file into smaller chunks (e.g., 4 x 10GB)?
PowerShell’s New-MailboxExportRequest cmdlet does not support splitting PST files by size. However, you can filter the export by date or folder. This creates smaller PST files.
Will I be able to Export a PST from a Dismounted Exchange Server using this PowerShell approach?
No, this method is only for active Exchange Servers. If you have a dismounted error use the tool to convert the EDB files into PST instead.
I did an Export before via the EAC do I still need to add a role?
In this scenario, we recommend that you perform a quick check. Select any mailbox, then hit the 3 vertical dots option. See if there is an “Export to PST” text in the popup menu. If there is then you can skip to the PowerShell export, you have to continue with the rest of the role assignment steps.
