How to Download Emails from Microsoft Exchange Server Easily
Every now and then there comes a request where people want to know how to download emails from Microsoft Exchange Server. You may be a user, who wants a backup for personal preservation, or an admin who needs to save important conversations for the entire organization.
Table of Contents
- Download Emails via EAC
- Use Outlook to Download Emails
- Powershell Commands
- Save Emails Professionally
- Backup Exchange Emails
- Conclusion
- Frequently Asked Questions
Doesn’t matter what your reason is the instructions we give here fit every scenario. So let us start by discussing how admins can complete this task on their end.
How to Download Emails from Microsoft Exchange Server via EAC?
The admin center is the most well-known method yet some novice admins may not be aware of the exact procedure.
Start off with Prerequisites to complete before admin/delegated users can download organization emails in bulk:
Create a Shared Folder (UNC Path):
The admin-side export can only happen with a shared folder on a network location where the email data gets deposited.
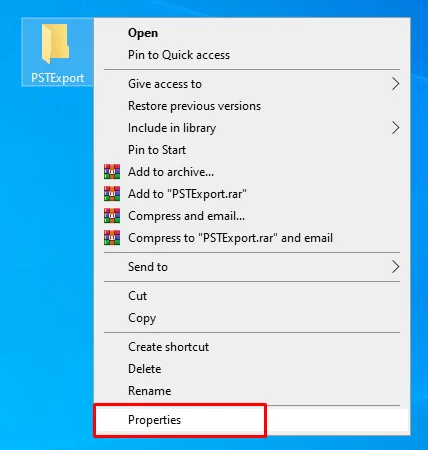
- Create a folder (e.g., “PSTExports”) on a server or workstation.
- Right-click the folder, and select “Properties.

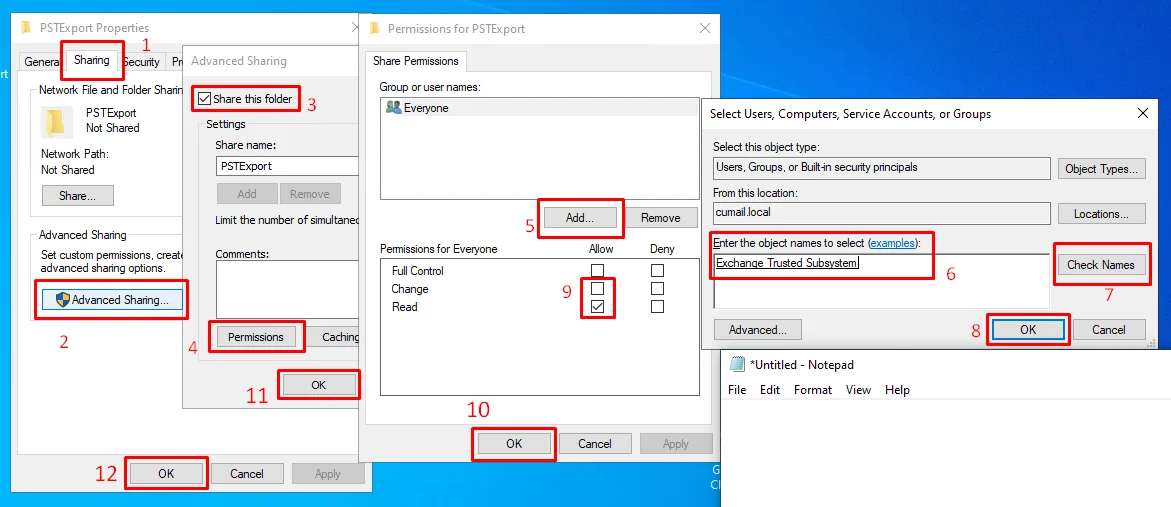
- Then under the “Sharing” tab, click “Advanced Sharing.”

- Check “Share this folder.”
- Click “Permissions,” then “Add,” type “Exchange Trusted Subsystem” (or DOMAIN\Exchange Trusted
- Subsystem), click “Check Names,” and “OK.”
- Grant “Change” permissions to “Exchange Trusted Subsystem.”
- Click “OK” on all dialogs.
- Note the UNC path (\\ServerName\ShareName).
Granting Permissions for Mailbox Export:
The account performing the export must have the “Mailbox Import Export” management role. This can be assigned via the EAC or EMS.
EAC: Permissions > Admin Roles > (Choose or create a role group) > Add the “Mailbox Import Export” role.
EMS: Add-RoleGroupMember “Organization Management” -Member “UserAccount” (or create a new role group).
Now if you are using the GUI method all you have to do is follow these instructions.
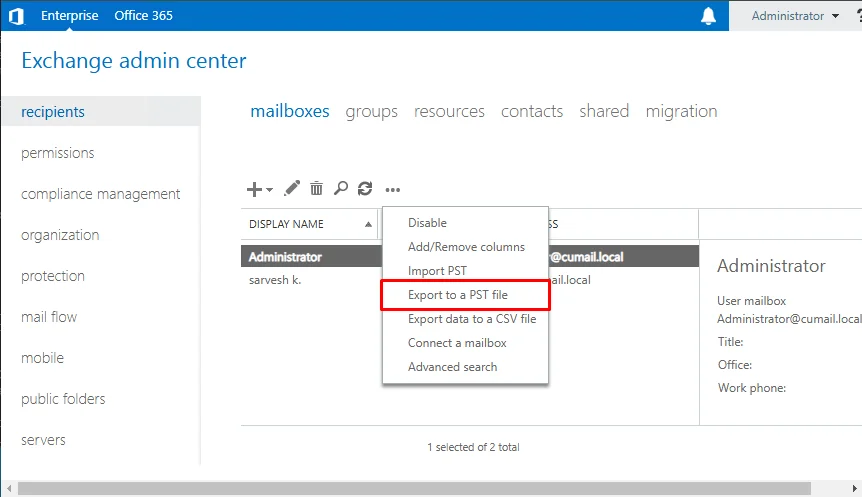
- Login to EAC (<server_IP/ecp>)
- Go to Recipients ( By default when you first open the EAC you end up here)
- As all emails are present in the mailbox select the mailbox whose emails you want to backup.
- Then click on the 3 horizontal dots present in the toolbar and select the Export type.

- Follow the rest of the instructions as they appear.
Note: To do all this the account must have the Mailbox Export Role. This role is not allowed by default so first admins must enable it from the Permissions section.
If you are not an admin but still need to make a backup for your mailbox we have some strategies to help you out as well.
Use Outlook and Download All Emails from Microsoft Exchange Server
Wherever there is an Exchange Server Outlook is the most common user-side email client. If you have just started using Outlook for Exchange Server and your account setup is pending you must complete it first. To configure Outlook for Exchange Server and continue from there. You must know that on-premise Exchange can only be set up in the classic edition.
Even when Microsoft no longer allows you to connect the Exchange on-premise with the modern edition of Outlook, Users can still switch back to the classic version (at least 2029) and use the Export option from there.
- Click on File
- Select Open & Export
- Click on Import/Export
- In the Import and Export Wizard
- Choose action as Export to a File
- Pick an Output format from the available options and follow the on-screen instructions to complete the rest.
If users just want the backup of one or two emails then they can drag and drop the conversations into a folder directly.
Otherwise, there is always the option to take a screenshot and preserve a view-only image of the email contents forever.
If you don’t want to configure the multiple settings that regular Outlook Export has you can directly go for the alternative route. Which is:
File > Save As > Browse for a location and Hit Save.
You can Print the mail to make a hard copy backup or change the printer settings to Select a Microsoft Print to PDF option and keep a copy of the conversation in that format.
PowerShell Commands to Fetch Exchange Server Emails
On your workstation press the Windows + Q key together.
Inside the Search box, type Exchange Management Shell
Press Enter or tap the the first result with your cursor.
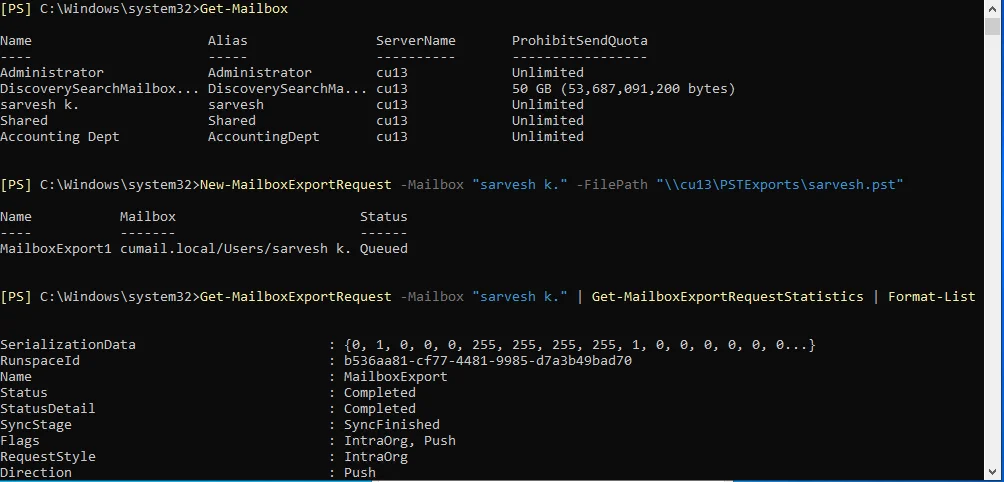
in the EMS instance list down all available Mailboxes via the command
Get-Mailbox
Then build a new export request by replacing the mailbox name with any one id from the list.
New-MailboxExportRequest [-Name <UniqueName>] -Mailbox <TargetMailboxIdentity> -FilePath <UNCPathToPST> [-IsArchive] [-SourceRootFolder <MailboxFolder>] [-TargetRootFolder <PSTFolder>] [-IncludeFolders <MailboxFolder1>,<MailboxFolder2>...] [-ExcludeFolders <MailboxFolder1>,<MailboxFolder2>...] [-ContentFilter <Filter>] [-Priority <PriorityValue>]
Check the Request Status:
Get-MailboxExportRequestStatistics -Identity "<MailboxIdentity>\<MailboxExportRequestName>"
You can also
Modify:
Set-MailboxExportRequest -Identity <MailboxIdentity>\<MailboxExportRequestName> [-BadItemLimit <value>] [-LargeItemLimit <value>] [-AcceptLargeDataLoss]
Suspend:
Suspend-MailboxExportRequest -Identity <MailboxIdentity>\<MailboxExportRequestName> [-SuspendComment "<Descriptive Comment>"]
Resume:
Resume-MailboxExportRequest -Identity <MailboxIdentity>\<MailboxExportRequestName>
Remove:
Remove-MailboxExportRequest -Identity "<UserName>\MailboxExport"
Request from the EMS console itself reference for the PowerShell commands has been taken from official Microsoft Documentation.
How to Save Emails from the Exchange Server Professionally?
The best option to download all emails from the Microsoft Exchange Server is to use the SysTools Exchange Export Tool. This professional solution is designed to keep all user requirements in mind. So that admins can easily configure increase or decrease the number of users whose emails get processed simultaneously.
Download Now Free Purchase Now 100% Secure
Moreover, with a delta backup system, the tool can even help to back up those emails that came in during the initial run.
The procedure to rerun backup for failed items or redo the entire thing again makes this the only solution you need. Below you will find the simple steps that you can learn to use this amazing utility.
Note that in case for some reason your mailboxes dismount from the server, you can use the EDB to PST Converter instead.
Steps to Backup Exchange Emails with a Tool
Step 1. Download a copy on your workstation, launch the tool, and begin by selecting the endpoints, as Exchange, and whatever format you wish to save the emails in.

Step 2. Scroll down to the workload area and mark the check box next to the emails option. You can also set up a date filter if need be.

Step 3. In the Source screen type in all the details (admin, email, Exchange Server IP, etc) and validate. Then press Next.

Step 4. Likewise, for the destination pick a path and Validate it, then hit Next.

Step 5. The user’s screen gives you 3 different ways to perform the mapping. You can Fetch users, Import a premade CSV, or Download a template, fill it, and Upload it to make the User list.

Step 6. The list appears in its entirety on the Preview Screen, where you can perform further selections and apply Priority marking. Validate and Press Backup.

Conclusion
So now we believe everyone is satisfied with the answers we gave on how to download emails from Microsoft Exchange Server. Among the multitude of ways discussed here, none match the easiness or variety of options present inside the tool. Therefore instead of manually struggling with traditional exports, or dealing with confusing PowerShell scripts it’s better to use the advanced solution.
Frequently Asked Questions
Why use EMS instead of regular PowerShell?
EMS has Exchange cmdlets pre-loaded and handles authentication automatically when run on an Exchange server.
Which out of all the methods is most suitable out of EMS, EAC, Outlook, and Tool?
If we rank the methods the tool described earlier easily beats other methods in every relevant metric. Be it speed, ease of use, or scalability. You need not struggle with the complex PowerShell commands or waste time figuring out the suboptimal GUI setup of the Exchange Admin Center. Moreover, unlike Outlook which only allows the export of one user mailbox at a time, with the tool you can pull the emails of every user in the organization at once.
Why is a UNC path required for New-MailboxExportRequest?
Exchange is a service that needs network access (with change/full control permission) to write the email data on the local file. A UNC path provides this network location and allows for proper permissions management.
What permissions are needed for mailbox export?
The account performing the export needs the “Mailbox Import Export” management role.
What happens if an account without permission tries to export a mailbox?
They will receive an “access denied” error in EMS. Moreover, they won’t even see the option in the case of the EAC.
Can users download emails via Outlook?
Yes, it is allowed by default. However, administrators can restrict this using Group Policy (Cached Exchange Mode settings), OWA policies, Client Access Rules, IRM, or DLP.
What is the usual timeframe for a mailbox export?
It depends on mailbox size, server hardware, network speed, and other factors. Small mailboxes might take minutes, while large mailboxes can take hours or even days. Use Get-MailboxExportRequestStatistics to monitor progress.
